
Na de afgelopen twee introductie artikelen over pulpgisten, die de theorie uitlegden, beschrijft dit artikel de eerste echte test.
Ik ga in dit verhaal laten zien wat het effect is van het pulpgisten van appels.
Nou hoor ik jullie denken: appels laat je toch niet pulpgisten. Die pers je toch meteen uit en je gebruikt dan toch alleen het sap.
Dat klopt natuurlijk als je enorme hoeveelheden appels tot je beschikking hebt. En niet iedereen verkeert in die gelukkige omstandigheden. Bij een aantal recepten die ik in 2009 ontwikkelde liet ik daarom de pulp wel meegisten. Een doorverwijzing naar deze recepten vindt je onderaan dit verhaal.
De opzet van de testen.
In alle testen die in de komende verhalen beschreven worden volg ik dezelfde procedure.
Ik neem een hoeveelheid fruit en verdeel dat in drie delen. Elk deel gaat in een pot die ik met letters A, B en C merk.
In de eerste pot (A) doe ik het te testen fruit met een beetje sulfiet om bederf te voorkomen.
In de tweede pot (B) gaat het fruit, ook weer met een beetje sulfiet, en daar meng ik pecto enzymen in.
In de derde pot (C) gaat ook weer het fruit met een beetje sulfiet, maar wordt er naast pecto enzymen ook gist toegevoegd. De gist wordt pas de tweede dag toegevoegd.
De reden dat de gist de tweede dag wordt toegevoegd is omdat het mogelijk is dat de pecto enzymen niet werken in een gistende most. Dat pecto enzymen niet werken in een most die al aan het gisten is heb ik in mijn tweede verhaal over pecto enzymen aangetoond. Dat kun je hier nog eens nalezen.
Elke dag wordt een beetje sap uit elk van de potten genomen en getest op SG en zuurgraad. Op deze manier kun je dan zien of er inderdaad (zoals de theorie beweert) in de loop der tijd meer stoffen in het sap terecht komen.
We weten op die manier ook of de stoffen vrijkomen door alleen de pulp in het sap te laten staan, of de pecto enzymen meer stoffen laten vrijkomen, en of door het gisten meer stoffen vrijkomen.
Test 1 Appels
Voorbereiding.
Ik had van een kennis een partijtje appels gekregen. Van deze appels had ik het klokhuis verwijderd, geschild en in partjes verdeeld. De partjes waren in zip-lock zakjes met een gewicht van 1 kilo ingevroren.

Ik begon met een zip-lock zakje uit de vriezer te halen. Ik maakte het zakje open en deed de bevroren appel partjes in een grote pot om te ontdooien.
De volgende dag waren ze ontdooid.
Dag 1
De ontdooide appels hadden al meteen een deel van hun sap losgelaten. Dat was een mooi helder sap.

Dit sap heb ik meteen gemeten.
Zoals je op de foto ziet heb ik de zuurmeting met behulp van de 'witte-tegel' methode gedaan. Mijn favoriete methode om zuur met behulp van titratie te meten.


Ik raad je aan mijn hele serie van 5 delen over zuurmeting nog eens na te lezen als je hier zelf geen ervaring mee hebt. Maar het belangrijkste deel is deel 5 over de 'witte-tegel' methode. Je kunt dat deel (waar verwijzingen naar de voorgaande delen in staan) teruglezen door hier te klikken.
Zoals de foto's duidelijk laten zien is de kleuromslag bij een zuurgraad van 10.
Aangezien er maar een kleine hoeveelheid sap was vrijgekomen was dit niet genoeg om het SG met de hydrometer te meten. Gelukkig heb ik een refractometer en heeft die maar 1 druppeltje sap nodig om het SG te kunnen meten. Zoals jullie weten hebben de meeste reftactometers ook een automatische temperatuur correctie. Daardoor hoefde ik ook niet te wachten met meten tot het sap 20 graden celsius was zoals de hydrometer voorschrijft.
De vele voordelen van een refractometer kun je hier nog eens nalezen.

Mijn refractometer gaf aan dat het appelsap een SG van 1050 had.
De eerste metingen waren gedaan.

Ik heb toen het sap en de appelpartjes over 3 potten verdeeld. In elke pot deed ik een mespuntje sulfiet om bederf tegen te gaan.
De potten kregen een label A, B en C.
Pot A was dus het sap van de vrijloop na het ontdooien, de appel partjes en een beetje sulfiet.
In Pot B zat hetzelfde als in pot A maar ik deed er een theelepeltje pecto-enzymen bij.
In Pot C zat ook hetzelfde als in pot A maar ook hier ging een theelepeltje pecto enzymen bij.
De potten werden op een warme plaats (kamertemperatuur) weggezet.
Dag 2
Het was meteen overduidelijk dat de pecto enzymen hun werk goed hadden gedaan.

In pot A was geen pecto enzyme bijgevoegd. Dat kun je zien. Deze pot bevatte nog steed grote brokken appel. In pot B en C waar de pecto enzymen waren bijgevoegd waren de appel partjes tot moes afgebroken. De foto laat dus goed de werking van de enzymen zien.
Maar nu nog eens kijken of de enzymen naast het afbreken van de cellen ook hebben gezorgd dat er meer suikers en zuren vrijkwamen.
Voorbereiding voor dag 3
In de derde pot (pot C) werd nu een theelepel gist gedaan. Deze pot werd nu niet meer met de deksel, maar met een stuk keukenpapier afgesloten. Net als bij een normale pulp-gisting.
We hebben nu 3 potten met elk een andere samenstelling.
Dag 3
Als ik pot C schudde dan hoorde ik de inhoud bruisen. Een teken dat de gisting had aangeslagen.
Dag 4
Pot C stond nog steeds te gisten.
Dag 5
De laatste dag van mijn metingen. Pot C gistte nog steeds.
De meetresultaten op een rij.
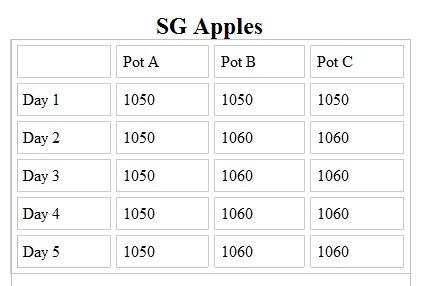
SG

Zuur

Wel de resultaten zijn overduidelijk.
Appels laten weken in hun sap.
Als je appels gewoon in hun sap laat weken dan zullen er op termijn geen extra suikers in het sap opgelost worden. Wel zal de zuurgraad een beetje stijgen maar later weer dalen. Pot A laat dit duidelijk zien.
Appels bewerken met Pecto enzymen
Als je de appels met pecto enzymen besprenkeld dan zal het SG een dag later gestegen zijn. Met andere woorden de appels laten extra suiker vrij die in het sap wordt opgelost. Ook de zuurgraad zal stijgen door het afbreken van de celwanden door de pecto enzymen.
Appels bewerken met pecto enzymen en pulpgisten.
Als je pecto enzymen een nacht op appels laat inwerken en daarna gist toevoegd dan zal het SG en de zuurgraad door de pecto enzymen stijgen. De gisting die op de derde dag wordt gestart heeft hier geen verdere invloed op.
Dat de Zuur graad in Pot C, de pot waar de gisting in plaatsvindt, iets meer stijgt heeft te maken met het vrijkomende koolzuurgas dat de meting beinvloed.
Grafieken.
Voor de duidelijkheid geef ik de resultaten hier weer in een grafiek. Dat maakt een en ander wat toonbaarder. Je kunt op de grafieken klikken om ze te vergroten en zo de gegevens wat duidelijker weer te geven.


Conclusie.
Pulp ferementatie op zich heeft bijna geen invloed op her SG en de zuurgraad van het sap. De stijging van het SG en de zuurgraad worden veroorzaakt door de pecto-enzymen.
De grafieken tonen aan dat het SG de tweede dag zijn hoogtepunt al heeft bereikt. Het zuur bereikt zijn hoogtepunt op de derde dag.
Appels bevatten bijna geen tannine. We kunnen dus uit dit experiment concluderen dat het geen zin heeft appels meer als 3 dagen te laten pulpgisten.
Alleen qua smaak kan ik geen echte pulp-gisting gebonden conclusie geven. De appels die ik hier gebruikte hadden zoals je ziet een heel hoge zuurgraad en dan proef je niet veel. Normaal worden appels meestal direct geperst en niet pulp-vergist. Eerlijk gezegd verwacht ik niet dat pulpgisting de smaak van de appelwijn drastisch zal verbeteren.
Let er alsjeblieft op dat deze resultaten gelden voor de appelsoort die ik testte. Bij andere soorten kunnen de resulataten afwijkend zijn. Doe deze test zelf bij twijfel.
In het algemeen gesproken kun je deze conclusies gebruiken bij het ontwikkelen van je eigen appelwijn recepten.
Verwijzingen in dit verhaal:
- Pulpfermenteren deel 1
- Pulpfermenteren deel 2
- Appel-vlierbessen wijn
- Appel-bramen wijn
- Cyser
- Appel-Perzikkenwijn
- Appel-aarbeienwijn
- Avonturen op het pectopad deel 2
- Zuurmeting deel 5 de 'witte tegel' methode
- Refractometer
Luc Volders
Copyright 2011
Geen deel van deze publicatie mag worden overgenomen
in welke vorm dan ook (web-pagina's, forums of gedrukte tekst)
zonder uitdrukkelijke schriftelijke toestemming van de
auteur.

The previous two introduction articles about pulpfermenting described the theory. Now on to the real tests.
In this first test I will show you the effect that pulpfermenting on apples has.
Hold on !!! Hold on !!! I can hear you thinking. Apples are generally never pulpfermented ??? You will just crush and press them, and only use the juice.
Well that is right if you can get large amounts of apples. And not everyone can lay his hands on such large volumes. So in several of my recipes which I published in 2009 I did pulpferment apples. You can find links to my apple recipes at the bottom of this story.
The tests.
In all tests that follow the same procedure will be followed.
First I take the fruit and divide it in three equal (in weight) parts. Each part is put in a jar labeled with A, B and C.
In the first jar (A) I put the fruit with a small amount of sulphite to prevent spoiling.
In the second jar (B) I put an equal amount of fruit, a bit of sulphite, and I'll mix in some pectic-enzyme.
In the third jar (C) I put the last bit of the fruit, a bit of sulphite, and again I'll mix in some pectic enzyme. The second day of the experiment yeast will be added to this jar.
The reason that the yeast is added the second day is that pectic enzymes might not do their job in a fermenting must. That pectic enzymes do not work in an environment where yeast is present was showed in my second story about pectic enzymes.
You can re-read that story here.
Each day a bit of juice is taken from the jars and acidity and SG is measured. This way we can see (like the theory describes) if more materials will dissolve in the juice during time.
These measurements will also show if more materials are dissolved into the juice by just soaking the fruit in the juice, whether pectic enzymes play an important role, and if fermenting even releases more materials.
Test 1 Apples
Preparations
A friend gave me some apples this summer. These apples were cored and peeled at the time and divided in parts. The parts were then put in zip-lock bags each wheighing 1 kilo.
I started with taking one of these zip-lock bags out of the freezer. The bag was opened and the contents was put in a large jar to thaw.
Next day they were thawed.
Day 1
The thawed apples had directly released part of their juice. This was a perfectly clear juice.
This juice was used for the first measurement.
As the pictures show I measured acidity with the 'white tile' method. This is my favorite method for testing acidity.
I urge you to re-read my complete 5 part series about measuring acidity if your not failiar with acidity testing. The most important part is however the 5th part which describes the 'white-tile' method.
You can re-read this story (in which you can find links to the other stories) by clicking here.
The photo's clearly show that the color change happened at 10. So the juice had an acidity of 10.
As I was working with a small amount of apples not much juice was released all the time. Not enough to do SG readings with a hydrometer anyway. Fortunately I owe a refractometer which only needs a drop of juice to accurately measure SG.
As you know, most refractometers have an automatic temperature correction. Therefore I did not need to wait till the temperature reached 20 degrees celsius to do the measurements. I should have done that when using a hydrometer.
The many advantages of a refractometer were described in an earlier web-log entry which can be re-read here.
The refractometer indicated that the juice had an acidity of 1050.
The first measurements had finished.
Next I equally divided the juice and the apple parts over three jars. To each jar was some sulphite added to prevent spoiling. The jars were labeled A, B and C.
Jar A contained the free-run juice from thawing, the apple parts and some sulphite.
Jar B contained the same however there was some pectic enzyme added.
Jar C also contained the same as jar A but to this jar also some pectic enzyme was added.
The jars were then put away at room temperature.
Day 2
It was crystal clear that the pectic enzymes did their job extremely well.
To jar A there was no pectic enzyme added. as you can see it still contains large pieces of apple. In jar B and C where pectic enzymes were added the apple parts were broken down to mash. The photo clearly shows the influence of pectic enzymes.
The figures will show if the pectic enzyme did more as just breaking down the cells. We are interested if there was more sugar and acid released.
Preparations for day 3
To the third jar (C) yeast was added. From that moment on the jar was not closed by the lid, but covered with some kitchen paper fastened with a rubber band. Just like I would do by a normal pulp-fermentation.
There were now 3 jars which each had a different contents.
Day 3
If I shook jar C I heard the bubbling of the fermentation. A definite sign that fermentation was well on its way.
Day 4
Jar C was still fermenting.
Day 5
The last day of my test and measurements. Jar C was still fermenting.
The measurements.
SG
Acid

Well the results are clear.
Soaking the apples in their juice for multiple days
If you just soak the apples in their juice there will be no extra sugars dissolved in the juice. Acidity will rise a bit and fall later on. Jar A clearly demonstrates this.
Processing the apples with pectic enzyme.
If you add pectic enzyme to the apples the SG will have risen within a day. So the apples will release extra sugar that will dissolve in the juice. Acidity also rises because cells are broken down by the enzyme.
Processing the apples with pectic enzymes and pulp-ferment.
As you can see from the figures the SG in jar B and C rise equally during the test period. Acidity also rose almost identical in both jars.
This demonstrates that pectic enzymes have the greatest influence on the SG and acidity and that fermentation does not aid releasing more sugar and acid.
A minor point of interest is the rise in acidity the last day in jar C, the jar that is fermenting. The rise in acidity is possibly due to the CO2 gasses that influence the measurement.
Graphs.
To make things more clear I put the results in a graph. You can click on the graphs to enlarge them and see the results in better detail.
Concluding.
Pulp-fermenting as such does not influence SG and acidity of the juice. The rise of the SG and acidity are caused by the pectic enzymes.
The graphs clearly show that SG has reached its peak already at day 2. Acid reaches its peak at day 3.
Apples do not contain tannin. So from this experiment we may conclude that there is no use in pulp-fermenting apples for more as 3 days.
However I can not give you any clues concerning flavor in this context. The apples that I used for testing had a very high acidity. With this kind of acidity you will not taste a lot flavor at all. Normally apples are mashed and directly pressed, and not pulp fermented. I do not think that pulpfermenting will improve the flavor of apple wine drastically.
Please be aware these are kitchen-table laboratory results. And that the results are valid for my apple variety. Other varieties may give different results. Do these tests yourself when in doubt.
Generally speaking however you may use the conclusion as a base for devellopping your own recipes.
Links in this story:
- Pulpfermentation part 1
- Pulpfermentation part 2
- Appel-elderberry wine
- Appel-blackberry wine
- Cyser
- Appel-Peach wine
- Appel-strawberry wine
- Adventures on the pectic path part 2
- Measuring acidity with the 'white tile method'
- Refractometer
Luc Volders
Copyright 2011
No part of this publication and pictures may be reproduced
in any form (printed text, web-pages, weblogs or forums)
without written permission of the author.